) is parsed as YAML, allowing more complex annotations. Make sure your indentation is consistent and correct, as it won't parse correctly otherwise.
## Swagger:operation [[docs]](https://goswagger.io/generate/spec/operation.html)
Using swagger:operation annotations gets you access to all of OpenAPI specifications, letting you describe your complex endpoints. If you are interested in details, you can read the specification docs.
In short - swagger:operation contains the following:
// swagger:operation GET /repo/{author} repos repoList
  // ---
  // summary: List the repositories owned by the given author.
  // description: If author length is between 6 and 8, Error Not Found (404) will be returned.
  // parameters:
  // - name: author
  //   in: path
  //   description: username of author
  //   type: string
  //   required: true
  // responses:
  //   "200":
  //     "$ref": "#/responses/reposResp"
  //   "404":
  //     "$ref": "#/responses/notFound"
1. swagger:operation - Annotation
2. GET - HTTP method
3. /repo/{author} - Path pattern, endpoint
4. repos - Space-separated tags under which route will be located, for example, "repos users"
5. repoList - Request which will be used for this endpoint. This one does not exist (is not defined), but the parameter is mandatory so you can put anything instead of repoList (noReq, emptyReq etc.)
6. --- - The part below this is the swagger spec in YAML. Make sure your indentation is consistent and correct, as it won't parse correctly otherwise. Note that if you specify the tags, summary, description or operationId as part of the YAML spec, you will override the summary, descriptions, tags or operationId, specified as part of the regular swagger syntax above.
7. summary: - Title
8. description: - Description
9. parameters: - URL Parameter (in this case {author}). Type is string, it is mandatory (swagger won't let you invoke the endpoint without typing it in), and it is located in the path (/{author}). The alternative to this is in:query for query params (?name="")
After defining your routes, you need to define your requests and responses. From the example repo, you can see that I created a new package for this, named swagger. This is not mandatory, but it puts all the boilerplate code in a single package named swagger. The downside of this is that you have to export your HTTP requests and responses.
If you do create a separate Swagger package, make sure to import it in your main/server file (you can do this by putting an underscore before the import):
## Swagger:parameters [[docs]](https://goswagger.io/generate/spec/params.html)
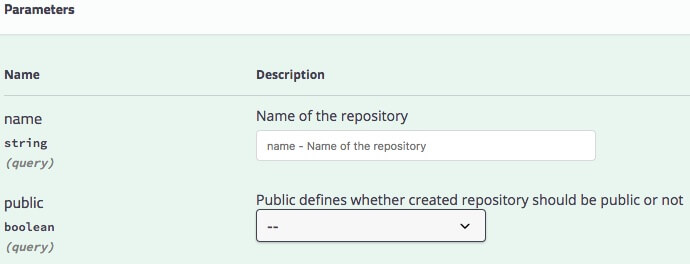
Depending on your application model, your HTTP request may vary (simple, complex, wrapped etc.). To generate Swagger specs you'll need to create a struct for every different request, even simple ones containing a number only (id for example) or string (name).
Once you have such structs (for example a struct containing a string and a boolean value), in your Swagger package define the following:
Line 1 contains a comment that will be visible on SwaggerUI
Line 2 contains swagger:parameters annotation, as well as the name (operationID) of the request. This name is used as the last parameter on routing annotations, to define the request.
Line 4 contains the position of this parameter (in:body, in:query etc.)
Line 5 is actual struct embedding. As mentioned earlier you don't need a separate package for swagger annotations (you could put the swagger:parameters annotation on api.CreateRepoReq), but once you start creating response annotations and validations, it will be much cleaner to keep swagger related annotations in a separate package.
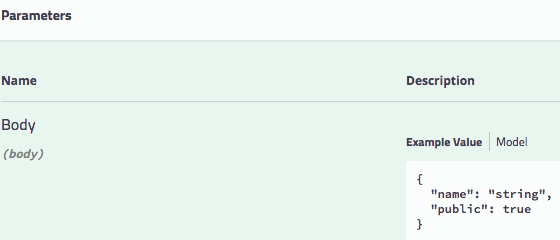
If you have large request, like create or update, instead of struct embedding you should create a new variable of that type. For example (notice the difference in 5th line):
// Request containing string
   // swagger:parameters createRepoReq
   type swaggerCreateRepoReq struct {
   // in:body
   Body api.CreateRepoReq
   }
This produces the following SwaggerUI request:
There are lots of validation annotations for swagger:parameters and swagger:response, with detailed description and how-to usage in the docs linked next to annotation titles.
## Swagger:response [[docs]](https://goswagger.io/generate/spec/response.html)
Response annotation is very similar to parameters annotation. The main difference is that quite often, responses are wrapped into more complex structs, so you have to account for that in swagger.
In my example repo, my success responses look like:
{
     "code":200, // Code containing HTTP status CODE
     "data":{} // Data containing actual response data
  }
To get started with common responses, such as error ones, I usually create model.go (or swagger.go) inside swagger package and define them inside. In example repo, the following response is used for OK responses (returning no data):
// Success response
   // swagger:response ok
   type swaggScsResp struct {
       // in:body
       Body struct {
          // HTTP status code 200 - OK
          Code int json:"code"
      }
   }
For error responses, most of them are similar to each other except for the name (and the comment on HTTP code in case of example repo). Nevertheless, you should still make structs for every error case, in order to put them as possible responses for your endpoints:
// Error Forbidden
   // swagger:response forbidden
   type swaggErrForbidden struct {
      // in:body
      Body struct {
          // HTTP status code 403 -  Forbidden
          Code int json:"code"
          // Detailed error message
          Message string json:"message"
      }
  }
Sample response with model.Repository in data:
// HTTP status code 200 and repository model in data
  // swagger:response repoResp
  type swaggRepoResp struct {
      // in:body
      Body struct {
          // HTTP status code 200/201
          Code int json:"code"
          // Repository model
          Data model.Repository json:"data"
      }
  }
Sample response with slice of model.Repository in data:
// HTTP status code 200 and an array of repository models in data
  // swagger:response reposResp
  type swaggReposResp struct {
      // in:body
      Body struct {
          // HTTP status code 200 - Status OK
          Code int json:"code"
          // Array of repository models
          Data []model.Repository json:"data"
      }
  }
In short, that will be enough to generate your API docs. You should add validations to your docs too, but following this guide will get you started. Since this is mostly composed out of my own experience, and to some extent looking at Gitea's source code, I'll be listening to feedback on how to improve this part and update it accordingly.
In case you have some issues or questions, I suggest checking the spec generation FAQ.
## Running SwaggerUI locally
Once your annotations are ready, you're most likely going to test it in your local environment. To do so, you need to run two commands:
1. Generate spec [[docs]](https://goswagger.io/generate/spec.html)
2. Serve [[docs]](https://goswagger.io/usage/serve_ui.html)
The command we use to generate swagger.json and serve it with SwaggerUI:
Once the command is executed, a new tab will be opened with SwaggerUI hosted at Petstore. The server has CORS enabled and appends the URL for the spec JSON to the petstore URL as a query string.
Alternatively, if you use the Redoc flavor (-F=redoc), the documentation will be hosted on your own machine (localhost:port/docs).
## Deploying on server
There are many ways to deploy the generated SwaggerUI on a server. Once you have your swagger.json generated it should be relatively easy to serve it.
The easiest way is serving static files via Golang server. More on that is available HERE.
Another way, our app is running on Google App Engine. The Swagger Spec is generated by our CI tool and served on /docs route.
We deployed SwaggerUI as a Docker service on GKE (Google Container/Kubernates Engine), that picks up the swagger.json from the /docs route.
Part of our CI (Wercker) script:
cwd: $GOPATH/src/bitbucket.org/orga/repo/cmd/api/
name: build
code: |
go get -u github.com/go-swagger/go-swagger/cmd/swagger
swagger generate spec -o ./swagger.json --scan-models
CGO_ENABLED=0 go build -a -ldflags '-s' -installsuffix cgo -o app .
cp app *.template Dockerfile swagger.json "$WERCKER_OUTPUT_DIR"
Routing:
func (d Doc) docHandler(c context.Context, w http.ResponseWriter, r http.Request) {
     r.Header.Add("Content-Type", "application/json")
     data, _ := ioutil.ReadFile("/swagger.json")
     w.Write(data)
  }
Dockerfile:
FROM swaggerapi/swagger-ui
  ENV API_URL "https://api.orga.com/swagger"
## Summary
SwaggerUI is a powerful API documentation tool, that lets you easily and beautifully document your APIs. With help of go-swagger project, you can easily produce a swagger specification file (swagger.json) needed for SwaggerUI.
In short, I described the steps I took in order to achieve this. There might be better ways, and I'll make sure to update this article according to the received feedback.
The example repo is available on GitHub. The Swagger.json generated from the example repo is available on LINK.